Posts

Namho budday!!

Image
NAMHO BUDDHAY! Who is not aware about Buddha,Gautam buddh is the first example which comes to our mind,when we talk about PEACE. Their are many followers of his teachings and lifestyle. SIMPLICITY is the best word to define  the divine soul. Whenever you search the internet for buddha, you will not end up with result something like my project. The reason why I choose this is PEACE. I tried to potrait the Meditating half face with bright colours to express my peace I experienced during the making of this piece. I hope you are also feeling the same only by looking at the picture. I tried to give this potrait a vintage look by giving crackling effect which enhances the beauty of the work. I hope I did the justice to the work and tried to potrait the originality of BUDDH personality. If you liked our work please show some love in Comments💕 Would really love❤ to hear from you. Thank you for visiting my post. Will be back soon with y

Chocolate bouquet

Image
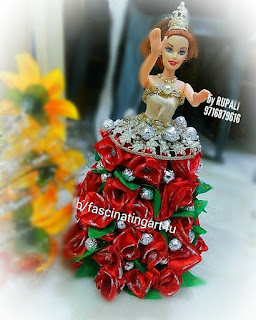
Hello! We are Back with another Tutorial. Today we have beautiful CHOCOLATE DOLL BOUQUET YUMMY!!! Isn't it😍 SO,let's start with the tutorial now. MATERIAL REQUIRED:- DOLL PEARLS RED & GREEN RIBBONS DESIGNER LACE CHOCOLATES ALUMINIUM FOIL GLUE GUN TOOTH PICKS THERMOCOL A PAIR OF SCISSORS STEPS:- Wash your doll and clean it.After that dress your Doll with the cloth piece. Now make a cone using half chart paper & stick it with fevicol on the waist.Dress this like a skirt. Now mark your thermocol with the height of chart paper and cut strips of thermocol. Now stick the strips with the help of fevicol on the chart paper skirt. Now let's make FLOWERS. FOR FLOWERS, take 2 Ribbons of Red colours and staple the ends of the Ribbon. After stapling the ribbon, overlap the ribbons on each other and repeat the process unless you reach the other end. Now pull any one end of the ribbon and tie it with a thread and your ROSE is ready.

steno. course for dsssb, group C jobs, agriculture and more.

Image
We will be uploading tutorial here and also on our youtube channel. you can take notes from our blog and save them for future reference. They will be helpful for you in revising in one go. Do visit our youtube regularly at 9 p.m. to check out detailed methods. any query, do leave a comment in comment section below, we will try to solve that as soon as possible.

Dot mandala

Image
Heya! We are back with one more tutorial today. I tried converted an old phone case into something new. Below is a pic.of my old phone case I converted this using dot mandala technique. Material required:- Acylic colour-Black 3d colour liners- yellow,orange,red,blue,violet,white Procedure:- Start by cleaning your old cover completely. After cleaning your cover apply 2 coats of black acrylic in the direction of lines on the phone case so that colour stick to the actual pattern of the case. After applying black,now select your colour to start with.(I used red 3d liner as you can see in the pic.above) After that keep on adding dots of your desired colours. Try to use yellow as the main colour as it will enhance the look of your product. No need to seal it with anything, colours won't fall off, they will be as it is.So, don't worry, keep on adding your colours freely & you are done with your new phone cover😃 You can total

Dot mandala

Image

Floral designer hangers

Image
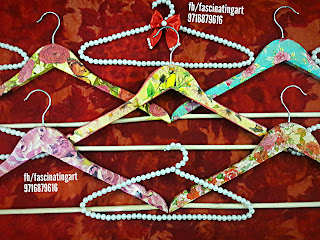
Welcome back!! As you can guess our today's tutorial, It is related to Hangers. You can use them for gifting on different occasions. Trousseau,House warming gift, even can make for your personal use. Now,let's start how to make it. MATERIAL REQUIRED: HANGERS DECOUPAGE GLUE  DESIGNER SHEET /RICE PAPER/ DECOUPAGE SHEET/ CAN TAKE PRINT OUT ON REGULAR PAPER YOUR DESIRED DESIGN. DECOUPAGE VARNISH A PAIR OF SCISSORS(optional) PENCIL Steps:- Take your decoupage sheet,peel off the white tissue from the back of the paper,select your desired design you wanna have,now, Take your hanger keep that on the back of the decoupage sheet and using pencil mark out the outline(it will reduce your work, but if you wish you can do tearing and pasting) After marking the shape of the hanger, with help of scissors cut the design (using scissors is optional, you can tear the edges roughly with your hand if you think you can do it without destroying the design

Designer candle

Image
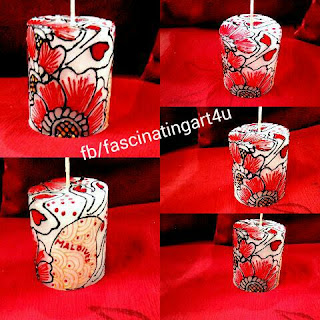
                     Welcome back! !! Hope you had a wonderful time &Wish you a wonderful day ahead.            Today,we will be discussing about                       "candle decoration". Yes! You heard it right, candle can also be decorated in a very innovative style. So,let's begin.. I made a candle of small size, If you know how to make a candle so you can make, you can also take the candle present at your home. Then, using pencil draw your design on candle and if you are not good in designing you can take print-out or trace any design. After finalising your design, use coloured 3d Outliner( here I selected Red)you can select your desired colour. Outline the design and                  TADDA!!! You are done😍 Your beautiful candle is ready. You can use them for wedding give-aways, return gifts in your celebration and even as a HOME DECOR. Give it a try once and you will be amazed with the beauty.                     I