Posts

Showing posts from July, 2018

steno. course for dsssb, group C jobs, agriculture and more.

Image
We will be uploading tutorial here and also on our youtube channel. you can take notes from our blog and save them for future reference. They will be helpful for you in revising in one go. Do visit our youtube regularly at 9 p.m. to check out detailed methods. any query, do leave a comment in comment section below, we will try to solve that as soon as possible.

Dot mandala

Image
Heya! We are back with one more tutorial today. I tried converted an old phone case into something new. Below is a pic.of my old phone case I converted this using dot mandala technique. Material required:- Acylic colour-Black 3d colour liners- yellow,orange,red,blue,violet,white Procedure:- Start by cleaning your old cover completely. After cleaning your cover apply 2 coats of black acrylic in the direction of lines on the phone case so that colour stick to the actual pattern of the case. After applying black,now select your colour to start with.(I used red 3d liner as you can see in the pic.above) After that keep on adding dots of your desired colours. Try to use yellow as the main colour as it will enhance the look of your product. No need to seal it with anything, colours won't fall off, they will be as it is.So, don't worry, keep on adding your colours freely & you are done with your new phone cover😃 You can total

Dot mandala

Image

Floral designer hangers

Image
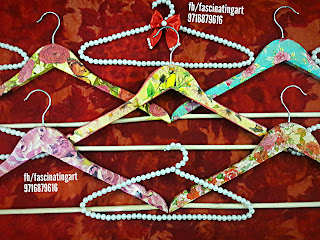
Welcome back!! As you can guess our today's tutorial, It is related to Hangers. You can use them for gifting on different occasions. Trousseau,House warming gift, even can make for your personal use. Now,let's start how to make it. MATERIAL REQUIRED: HANGERS DECOUPAGE GLUE  DESIGNER SHEET /RICE PAPER/ DECOUPAGE SHEET/ CAN TAKE PRINT OUT ON REGULAR PAPER YOUR DESIRED DESIGN. DECOUPAGE VARNISH A PAIR OF SCISSORS(optional) PENCIL Steps:- Take your decoupage sheet,peel off the white tissue from the back of the paper,select your desired design you wanna have,now, Take your hanger keep that on the back of the decoupage sheet and using pencil mark out the outline(it will reduce your work, but if you wish you can do tearing and pasting) After marking the shape of the hanger, with help of scissors cut the design (using scissors is optional, you can tear the edges roughly with your hand if you think you can do it without destroying the design

Designer candle

Image
                     Welcome back! !! Hope you had a wonderful time &Wish you a wonderful day ahead.            Today,we will be discussing about                       "candle decoration". Yes! You heard it right, candle can also be decorated in a very innovative style. So,let's begin.. I made a candle of small size, If you know how to make a candle so you can make, you can also take the candle present at your home. Then, using pencil draw your design on candle and if you are not good in designing you can take print-out or trace any design. After finalising your design, use coloured 3d Outliner( here I selected Red)you can select your desired colour. Outline the design and                  TADDA!!! You are done😍 Your beautiful candle is ready. You can use them for wedding give-aways, return gifts in your celebration and even as a HOME DECOR. Give it a try once and you will be amazed with the beauty.                     I

Mixed media phone cover-upcycled project

Image
  Hello! !! Welcome back !! Today,I am here with an awesome diy, You just have to use the simple things available with you and you can do Wonders. I was having this old cover with me (as shown below) Procedure:- *Apply coat of  Chalk paint. I applied Black chalk paint you can choose as per your choice. *Stick available chipboards,flowers with strong bond. *Using colour splash spray colours, Add colours (you want on your project). *You can also some glitters or shimmers. *I kept the stones untouched and natural coloured. & Finally TADDA!!!!! You are now done with your new and creative cover to Flaunt. Hope you like today's blog.. Give it a try & Do share your experience... We will be more than happy to hear your suggestions😍 Keep crafting!! Have a wonderful day ahead. Will meet you soon. With lots of love RUPALI (FASCINATING ART) you can also check out the you tube video of the same, The link is posted below👇👇

Marquee letter

Image
Hi! Welcome to My blog. I hope you will find my work inspiring. So,let's get started❤ I tried making these different Home decor letters. These are made up of wood and hollow from within & have holes of 6mm leaving equal gap in between. I used 10" sized wooden letter of thickness 26mm, Left a margin of 2" on the borders of the letter,after that I coloured it with different acrylic colours (applied 3 heavy coats)  as acrylic colour dry up fast so I started fixing led lights in the holes with the help of glue gun & finalised my letter with white TT balls,in  which using rode I pierced the center. And TADDA!!! MY MARQUEE LETTER IS READY.. SIMPLE,EASY &ATTRACTIVE HOME DECOR. THANKS FOR HOPPING ONTO MY BLOG. HOPE YOU HAD A WONDERFUL DAY AHEAD. WITH LOTS OF LOVE❤ RUPALI 

Album

Image
                     Hello! I am Rupali from Fascinatingart. Today I am sharing my project related to beach and travel related. I loved making this album, It has vibrant colours and helping in relieving the hot summer vibes. I used real seashells, leaves and stones with chipboards glued everything with regular glue. I created this just as my leisure time activity. I hope you will love it too. Thank you for visiting my blog. Have a happy day ahead. I am submitting my projecf for following challenges- http://www.scrapyland-blog.com/2018/08/scrapy-land-challenge-95.html?m=1 http://countryviewchallenges.blogspot.com/2018/08/august-2018-sun-sea-and-sand.html?m=1 https://www.simonsaysstampblog.com/mondaychallenge/?p=13470 http://traumfabrik-challenge.blogspot.com/2018/07/challenge-58-beach.html?m=1 http://creativefingerschallengeblog.blogspot.com/2018/07/challenge-150-winners-148.html?m=1 https://scrapping4funchallenges.blogspot.com/2018/07/challenge-119-hol